
When it comes to RVing, having a reliable power source is essential. One of the most common methods of charging an RV battery is by using a generator. If you’re new to RVing or simply need a refresher, we’ve got you covered with these six easy steps for how to charge an RV battery with a generator.
First, you’ll want to ensure that your generator is fully charged before starting the charging process. It’s also important to turn off your RV or vehicle and engage the emergency brake to avoid any accidents. Check the battery terminals for rust or dirt and clean them if necessary to ensure a smooth charging process. Follow these simple steps to charge your RV battery with a generator and keep your power source running smoothly during your travels.
Related Posts:
How to Charge an RV Battery With a Generator – Understanding RV Batteries
Regarding RV batteries, there are two main types: starting batteries and deep cycle batteries. Starting batteries are designed to provide a quick burst of power to start the engine, while deep cycle batteries are designed to provide a steady flow of power over a longer period of time.
Most RVs use deep cycle batteries, which come in two different types: flooded lead-acid batteries and sealed AGM (Absorbed Glass Mat) batteries. Flooded batteries are the most common type and require regular maintenance, such as adding distilled water to the cells. Sealed AGM batteries are maintenance-free but tend to be more expensive.
To determine the right type and size of battery for your RV, you need to consider your power needs and usage. A larger battery will provide more power but also be heavier and more expensive. You should also consider the charging system of your RV and whether it is compatible with the type of battery you choose.
When charging your RV battery with a generator, there are a few things to keep in mind. First, make sure the battery is not disconnected and that the converter circuit breaker is turned on. Second, check the generator’s primary breakers to make sure they are not tripped. Finally, examine the battery’s water level and general condition.
By following these steps and choosing the right type and size of battery for your RV, you can ensure that you have the power you need for all your adventures on the road.
Related Posts:
How to Charge an RV Battery With a Generator – Generator Basics
When it comes to charging an RV battery with a generator, it is important to have a basic understanding of how generators work. A generator is a device that converts mechanical energy into electrical energy. It does this by using a fuel source, such as gasoline or propane, to power an engine that turns a rotor inside a magnetic field. This rotation creates an electrical current that can be used to power appliances and charge batteries.
Generators come in various sizes and power outputs, ranging from small portable models to large stationary units. When selecting a generator to charge your RV battery, it is important to choose one that is compatible with your RV’s electrical system. Look for a generator that has a standard 30 amp/120-volt receptacle built into it, or an adapter if it’s 220-volt.
Before charging your RV battery with a generator, turn off your vehicle and use the emergency brakes to prevent accidents. Also, inspect the battery terminal carefully and clean any rust or dirt on it to ensure a smooth charging process.
Related Posts:
Step 1: Safety Precautions
When charging an RV battery with a generator, it is important to take the necessary safety precautions to avoid accidents. Here are some safety measures that we recommend:
- Turn off the car or vehicle before starting the charging process. This will prevent any unwanted accidents.
- Engage the emergency brake mode to keep the vehicle steady while charging the battery.
- Check the battery terminal carefully for any rust or dirt. Clean it up if you find any, as this can interfere with the charging process.
- Check the oil and fuel levels, as well as the air filter, before trying to start your generator. This will ensure that your generator is running smoothly and efficiently.
- Use protective gear such as gloves and goggles to avoid any injuries during the charging process.
- Do not smoke or light any fires near the generator or battery while charging.
- Keep children and pets away from the charging area to avoid any accidents.
By following these safety precautions, you can charge your RV battery with a generator without any mishaps.
Step 2: Preparing the Generator
Once you have determined the appropriate generator for your RV battery, it’s time to prepare the generator for charging. Here are the steps:
- Choose a flat and level surface for the generator. This will ensure the generator is stable and won’t tip over while running.
- Check the oil level in the generator and add oil if necessary. Most generators require oil to operate, so it’s important to make sure that the oil level is sufficient before starting the generator.
- Fill the generator with gasoline or diesel fuel. Make sure that you use the appropriate type of fuel for your generator. Refer to the owner’s manual for specific instructions on how to fill the generator with fuel.
- Turn off all electrical devices in your RV. This will prevent any power surges or other electrical issues while you are charging the battery.
- Connect the RV power cord to the generator. Make sure that the generator is turned off before plugging in the RV power cord.
- Turn on the generator and let it run for a few minutes before attempting to charge the battery. This will allow the generator to warm up and stabilize before it begins to charge the battery.
Following these steps, you can ensure your generator is prepared for charging your RV battery.
Related Posts:
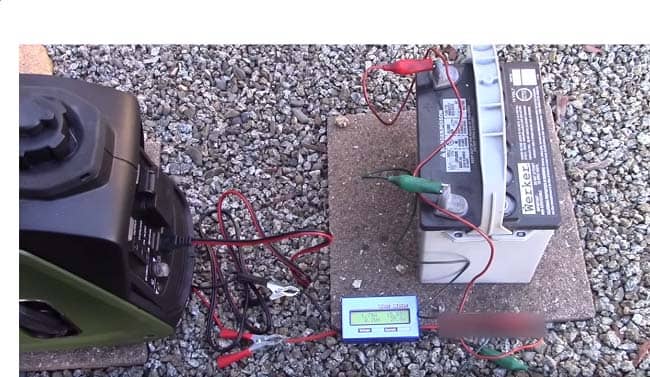
Step 3: Connecting the Battery to the Generator
Once you have your generator and battery charger ready, it’s time to connect your RV battery to the generator. Here are six easy steps to follow:
- First, locate the battery on your RV. It’s usually found in a compartment outside the RV or under the hood.
- Next, use a wire brush or other tool to clean the terminal points on the battery. This will ensure a good connection between the battery and the generator.
- Connect the red cable from the battery charger to the positive terminal on the battery. The positive terminal is usually marked with a plus sign (+).
- Connect the black cable from the battery charger to the negative terminal on the battery. The negative terminal is usually marked with a minus sign (-).
- Start the generator. Be sure it’s placed on a level surface and a few feet away from your RV.
- Finally, plug the battery charger into the generator using the appropriate adapter. Your generator should have a standard 30 amp/120-volt receptacle built into it. If it’s 220-volt, then you will need an adapter.
That’s it! Once your battery is connected to the generator, the battery charger will do the rest of the work. Just let it run for several hours until the battery is fully charged.
Step 4: Charging the Battery
Now that the generator is running and the battery is connected, it’s time to charge the RV battery. Follow these steps to ensure a successful charge:
- Monitor the charging process: Keep an eye on the battery voltage level and the generator’s output. You can use a multimeter to measure the battery voltage. The voltage should increase as the battery charges.
- Charge the battery: Allow the battery to charge for several hours until the voltage reaches a level of 13.6 to 14.4 volts. This indicates that the battery is fully charged.
- Turn off the generator: Once the battery is fully charged, turn off the generator and disconnect the battery from the generator.
- Check the battery connections: Before disconnecting the battery, make sure the connections are tight and secure. Loose connections can cause the battery to discharge quickly.
- Test the battery: After charging the battery, test it to make sure it’s holding a charge. You can do this by turning on the RV lights or other appliances and seeing if they work properly.
Following these steps, you can safely and effectively charge your RV battery with a generator safely and effectively.
Related Posts:
Step 5: Disconnecting the Battery
When it’s time to disconnect the battery from the generator, you’ll need to follow a few simple steps to ensure your and your RV’s safety.
First, turn off the generator and unplug the power cord from the receptacle. Then, use a wrench to loosen the negative terminal cable from the battery. Be sure to remove the negative cable first to prevent any accidental electrical discharge.
Next, loosen and remove the positive terminal cable from the battery. Once both cables are removed, carefully lift the battery out of its compartment and place it safely away from any flammable materials.
It’s important to note that batteries can be heavy and difficult to handle, so be cautious when lifting and moving them. If you’re unsure about how to disconnect your RV battery safely, consult your owner’s manual or seek advice from a professional.
Following these simple steps, you can safely disconnect your RV battery from your generator and ensure it’s ready for your next adventure.
Step 6: Post-Charging Maintenance
After charging your RV battery with a generator, it’s important to perform some post-charging maintenance to ensure the longevity of your battery. Here are some things to keep in mind:
- Check the battery water level: Make sure to check the water level in your battery after charging it with a generator. If the water level is low, add distilled water to the battery cells until the water level reaches the appropriate level. It’s important not to overfill the battery cells, as this can cause damage to the battery.
- Inspect the battery terminals: Check the battery terminals for any signs of corrosion or damage. Use a wire brush to clean the terminals if you notice any corrosion. You can also use a mixture of baking soda and water to clean the terminals. After cleaning, apply a thin layer of petroleum jelly to the terminals to prevent further corrosion.
- Test the battery: After charging the battery, it’s a good idea to test it to ensure it’s holding a charge. You can use a multimeter to test the battery voltage. A fully charged battery should read between 12.6 and 12.8 volts. If the voltage is lower than this, you may need to charge the battery again.
- Store the battery properly: If you’re not going to be using your RV battery for an extended period of time, it’s important to store it properly. Store the battery in a cool, dry place away from direct sunlight. You can also use a battery maintainer to keep the battery charged while it’s in storage.
By following these post-charging maintenance tips, you can help ensure the longevity of your RV battery and avoid any potential issues down the road.
How to Charge an RV Battery With a Generator – Conclusion
In conclusion, charging an RV battery with a generator is a simple process that can be done in six easy steps. By following these steps, you can ensure that your battery is charged efficiently and effectively, allowing you to enjoy your RV adventures without any interruptions.
It is important to remember that the condition of your battery is crucial in determining the success of the charging process. Before beginning, ensure the battery is in good condition and free of debris or corrosion.
Additionally, it is important to ensure that the generator is properly connected to the RV and that the battery charger is connected to the battery correctly. Checking the water level and general condition of the battery is also crucial in ensuring that the battery is charged properly.
By following these steps, you can rest assured that your RV battery will be charged and ready for your next adventure. Don’t forget to regularly check the condition of your battery and generator to ensure that they are both in good working order. Happy travels!
How to Charge an RV Battery With a Generator FAQs
Will a 2000-watt generator charge RV batteries?
It depends on the size of your RV battery. A 2000-watt generator is typically not powerful enough to charge a large RV battery, but it can be sufficient for smaller batteries. If you have a larger battery, it’s best to use a generator with a higher wattage.
How long does it take to charge an RV battery from a vehicle?
The time it takes to charge an RV battery from a vehicle depends on several factors, including the size of the battery, the capacity of the vehicle’s charging system, and the condition of the battery. In general, it can take several hours to charge an RV battery from a vehicle fully.
Can you charge an RV battery with a generator?
Yes, you can charge an RV battery with a generator. To do so, you must connect the battery charger to the battery and then start the generator. Ensure the generator is placed on a level surface and a few feet away from your RV.
How do you keep motorhome batteries charged?
You can use a solar panel, a battery charger, or a generator to keep your motorhome batteries charged. It’s also important to make sure your batteries are properly maintained and that you are not overusing them.
How to charge a marine RV battery?
Charging a marine RV battery is similar to charging any other type of RV battery. You can use a battery charger or a generator to charge the battery. Be sure you follow the manufacturer’s instructions and use the appropriate charger for your battery.
Why won’t my generator charge my RV battery?
There are several reasons why your generator may not be charging your RV battery. It could be a problem with the battery, charger, or generator’s charging system. It’s best to have a professional diagnose the issue to ensure it’s properly resolved.